SSH keys are very convenient and more secure than using only a password to authenticate. If you created your SSH key a while ago, it’s probably time to generate new keys. SSH keys like DSA and RSA 1024 are very old and now insecure. You should even upgrade ssh keys that are RSA 2048. But really, it’s time to start using RSA 4096 for legacy servers, and Ed25519 for servers with modern ssh key support.
The below commands are based on the post Upgrade your SSH keys. Check that out for more details.
Identify and rename old ssh keys
First, identify your old ssh keys:
$ cd ~/.ssh
$ for sshkey in $(ls *.pub);do echo $sshkey;ssh-keygen -lf $sshkey;done
/home/ryan/.ssh/id_rsa.pub
2048 SHA256:gIDkzI98pEna3j9+2Ja5di0+k2dCaXtCtx6k71dskA1 ryan@home (RSA)
From the output, this is showing it is an RSA 2048 key.
Next rename your old public and private ssh keys:
$ mv id_rsa.pub id_rsa_legacy.pub
$ mv id_rsa id_rsa_legacy
Stop using insecure keys
Use only keys that are greater than RSA 2048, or Ed25519.
Specifically, remove:
- DSA
- RSA 1024 and 2048
- ECDSA
Just be sure you aren’t using these ssh keys. Only remove them when you no longer need them and have the new keys setup and working.
Create or Change your existing password
If you old RSA ssh key didn’t use a password, now is the time to set a password. You can upgrade ssh keys that previously existed and didn’t use a password, without breaking anything. Also adding 100 rounds helps make your old key more secure when at rest if you need to continue using it.
$ ssh-keygen -f ~/.ssh/id_rsa_legacy -p -o -a 100
Upgrade ssh keys – Generate RSA 4096 ssh keys
RSA 4096 is good to use for legacy systems which do not yet support the new Ed25519 key.
Generate the RSA 4096 keys, and make sure to use a strong password:
$ ssh-keygen -t rsa -b 4096 -o -a 100
Generating public/private rsa key pair.
Enter file in which to save the key (/home/ryan/.ssh/id_rsa):
Enter passphrase (empty for no passphrase):
Enter same passphrase again:
Your identification has been saved in /home/ryan/.ssh/id_rsa.
Your public key has been saved in /home/ryan/.ssh/id_rsa.pub.
The key fingerprint is:
SHA256:732MQCPPaMS815Y7MFXl4n2WXuawR1Zsat+PEG1TnPA ryan@home
The key's randomart image is:
+---[RSA 4096]----+
|         +. o+.oo|
|        o * .+*..|
|         B oo=Eo.|
|          =o=..oo|
|        S .BoBo+=|
|         .  *.Ooo|
|          .  B =.|
|        .   B * .|
|          .... . |
+----[SHA256]-----+
The “-o -a 100” means it is harder to crack the private key’s password using brute-force attacks. If your legacy system doesn’t support this, remove this option.
Upgrade ssh keys – Generate Ed25519 ssh keys
Ed25519 ssh keys work on modern systems (OpenSSH 6.7+) and are much shorter than RSA keys. Note, the “-o -a 100” option is implied with Ed25519 key generation.
Generate your new Ed25519 key and use a strong password:
$ ssh-keygen -t ed25519
Enter passphrase (empty for no passphrase):
Enter same passphrase again:
Your identification has been saved in /home/ryan/.ssh/id_ed25519.
Your public key has been saved in /home/ryan/.ssh/id_ed25519.pub.
The key fingerprint is:
SHA256:oU44/TftLl2/d4IKQla36Z1TMqrcdK1xBcerye78fxM ryan@home
The key's randomart image is:
+--[ED25519 256]--+
|        . .      |
|     . . . . .   |
|    . o .   o o .|
|   .   + . o o = |
|    . + S * + +  |
|     = . = B  .E |
|      + B.=.oo ..|
|       =.=o.o ..=|
|      ..oo=+o..+=|
+----[SHA256]-----+
Now you have both RSA 4096 and Ed25519 ssh keys ready to go.
Next, add the keys to your ssh agent so it will remember the keys for you.
Install and configure ssh agent
Using an ssh agent allows you to type in a password once, and then the agent remembers the ssh keys.
On Ubuntu 16.04 there is one problem though. The built-in Gnome-keyring doesn’t support Ed25519. To work-around this, you could use the normal ssh-agent. But, I suggest instead to use gpg-agent and disable the gnome-keyring.
The below commands are based on the Arch wiki and an answer from the Ask Ubuntu Forum.
Disable Gnome ssh keyring daemon (reference):
$ cp -rp /etc/xdg/autostart/gnome-keyring-ssh.desktop ~/.config/autostart
$ echo "Hidden=true" >> ~/.config/autostart/gnome-keyring-ssh.desktop
Install gpg-agent:
$ sudo apt-get install gpa gnupg-curl
Enable ssh support in gpg-agent, and set a timeout to remember the key and password for 1 hour, since this adds some convenience:
$ echo "enable-ssh-support" >> ~/.gnupg/gpg-agent.conf
$ echo "default-cache-ttl-ssh 3600" >> ~/.gnupg/gpg-agent.conf
$ echo "max-cache-ttl-ssh 3600" >> ~/.gnupg/gpg-agent.conf
Edit your .bashrc to automatically load gpg-agent when you log in.
$ vi ~/.bashrc
# Set SSH to use gpg-agent
unset SSH_AGENT_PID
if [ "${gnupg_SSH_AUTH_SOCK_by:-0}" -ne $$ ]; then
export SSH_AUTH_SOCK="~/.gnupg/S.gpg-agent.ssh"
fi
Reload gpg-agent:
$ gpg-connect-agent reloadagent /bye
Next, add your new ssh keys to the gpg-agent:
$ ssh-add ~/.ssh/id_ed25519 ~/.ssh/id_rsa ~/.ssh/id_rsa_legacy
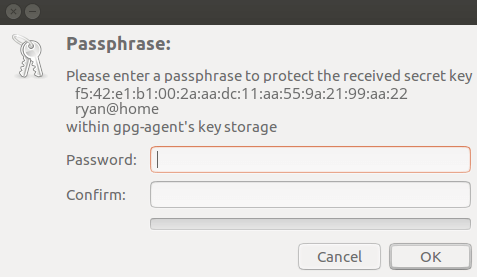
You will be prompted to enter your ssh key password. And after you enter that, another prompt will pop-up, from the gpg-agent. It will be used to unlock the gpg-agent’s key storage. This should be a different password than the password for your ssh keys. You will be prompted to enter this password every time you log in, or after the 1 hour timeout.
Enter the password that you want to use to unlock the gpg-agent key storage. And if you use the same password here for all your ssh keys, you only have to unlock it once:
And now you can list your keys stored in the gpg-agent:
$ ssh-add -l -E md5 # list fingerprint using md5 hash
$ ssh-add -l        # list fingerprint using sha256 hash
$ ssh-add -L        # list public key parameters
Re-deploy the new public keys
Lastly, you need to add your new public keys to your servers. This command will ssh to your server and add your new public keys to the authorized_keys file.
Change 1.2.3.4 to your server’s IP:
$ ssh 1.2.3.4 "mkdir -p .ssh;echo $(cat ~/.ssh/id_ed25519.pub) >> .ssh/authorized_keys;echo $(cat ~/.ssh/id_rsa.pub) >> .ssh/authorized_keys;chmod 700 .ssh;chmod 640 .ssh/authorized_keys"
Be sure to do this for ever server you connect to.
Important: Be sure you don’t lock yourself out of your servers. Have another session open and test to make sure you can log in again after making this change.
Now you can remove your old ssh key from the ssh agent and only use the secure ssh keys:
$ ssh-add -d 2>/dev/null;ssh-add ~/.ssh/id_ed25519;ssh-add ~/.ssh/id_rsa
Be sure to add the Ed25519 key first, like above. Since it seems to be a feature that prioritizes RSA keys first. So add the Ed25519 key first.
SSH to your servers to test the new key is working. You can also see in the logs the type of ssh key being used.
Confirm using the new Ed25519 ssh key, on Ubuntu 16.04:
$ grep " sshd\[" /var/log/auth.log|grep "Accepted publickey"|tail
Feb 11 10:00:00 home sshd[1802]: Accepted publickey for ryan from 192.168.1.100 port 60708 ssh2: ED25519 SHA256:oU44/TftLl2/d4IKQla36Z1TMqrcdK1xBcerye78fxM
Conclusion
Now you have more secure ssh keys since you are using Ed25519 and RSA 4096 keys. You have been able to upgrade ssh keys that are insecure! Next, you should look into updating your ssh server and client settings to use better encryption settings, using these references.
And if you don’t want to manually deploy the new ssh keys to all of your servers, instead you can use Ansible for user management.