You want your website to load fast. How? You can speed up WordPress with this Image Optimization Guide. Most of this actually applies to any website, not just WordPress!
A fast website is good for your visitors because users don’t like to wait. Fast is also good for Search Engine Optimization (SEO) ranking in Google. One way to have your website load faster is to reduce the size of what needs to load when a visitor goes to your website. Pictures can be a huge contributor to your website’s page size. How can you fix this? Let’s talk about how to Speed up WordPress with Image Optimization.
Just don’t forget, having a good hosting provider is key. Having optimized images won’t fix a slow hosting provider!
This can be a big topic if we really go in-depth. If you already know the basics then jump to the Image Quality section. Just don’t miss out on the Tools sections, where I share some time saving tools.
Image Optimization Guide
Less Pictures
Having too many pictures can really slow down your website. Even if they are all optimized, loading too many pictures adds up for the overall page size and also adds to the number of requests being sent. Use only relevant pictures.
PNG vs JPG
What picture file format to use? There is a lot of information related to this discussion. So let’s make this simple.
I use PNG for screenshots and logos.
I use JPG for photographs. Just remember that saving the same JPG over and over will reduce the quality.
Confused? Check this out for more information.
Image File Size
You don’t want your pictures to be too big. That’s the whole point of this discussion! Reducing a picture’s file size helps your website load faster.
Generally, I try to make sure my pictures are around 100 KB (Kilobytes) each. But this really depends on your website’s goals and content. If you have a photography website then obviously your pictures are the main focus. Having a few pictures per page over that size should be fine.
Remember: Reducing the Image Dimensions and the Quality both impact the image file size. More on those topics further down.
Image Dimensions
Use conservative image dimensions (width and height in pixels). Don’t use a full size picture at 5184 by 3456 pixels that is 5 megabytes. Before uploading a picture to WordPress, resize the picture to dimensions that make sense for your website when a visitor is on a desktop computer. Typically I resize a picture to the same setting I put in the WordPress Media Settings for the Large Size option.
There are also other options for Medium and Thumbnail sizes. All of these settings really depend on your website design and goals. Personally, I like these settings for my website:
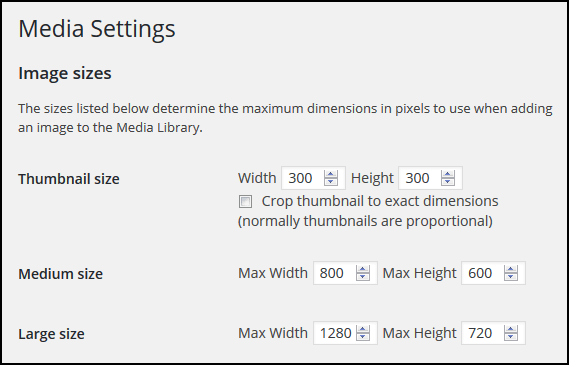
Tip: If you don’t need a certain image size, just put the width and height to zero.
Tip #2: If you change these settings, only new pictures will get resized to the new settings. Use the free plugin Regenerate Thumbnails to re-create thumbnails for existing pictures.
WordPress automatically create copies of the image for all of the above sizes when you upload a picture. There could be more, depending on your theme (using a featured image for example). If you are a developer and need more sizes (or aren’t afraid of coding), you can use the add_image_size() function to add any other image dimensions you need to use in your theme. But for normal users, you don’t need to worry about that.
I know what you’re thinking, this is getting a little too detailed. Keep reading and you might learn something new. Or skip down a bit.
Let’s get back to talking about using pictures on your website. Don’t use a picture that has dimensions of 1280 by 720 pixels (for example) if your website won’t display the picture at those dimensions. Your theme should dynamically scale your image’s dimensions making the picture smaller so that it fits on your web page. Scaling means the 1280 by 720 pixel picture is reduced to fit on your screen.
This is a waste and is increasing your total page size for no reason, since the full sized photo you chose is still being sent to your visitor. A good solution is to show a small or medium sized picture on your post, and when your website visitor clicks on the picture it opens to show a larger picture (which wouldn’t fit inside of your post with everything else, so it would be scaled). Here’s an example:

Above is a properly sized picture for my theme, and it opens to the Large size when clicked. There’s more on this effect of using a Lightbox plugin in my previous post.
What image dimensions to use on your website?
The answer to that depends on a few things. What dimensions does your WordPress theme display your images? Mine is around 800 pixels wide in the post area. Typically, most themes should be fine displaying pictures between 600 to 800 pixels wide.
The last thing I’ll mention in this Image Dimension section is do not use the Jetpack Photon Module to dynamically resize your images. It may seem like a good idea, but the current state of it has too many negatives.
Ok, Let’s move on to Image Quality.
[Tweet “Ultimate Image Optimization Guide for #WordPress”]
Image Quality
Now that you have the right number of pictures, and they are at the optimal dimensions, it’s time to speed up WordPress with the final step, Image Optimization.
Optimizing your images means reducing their size. There are two ways to optimize images. Lossy and Lossless. You can do one or the other, or both.
Lossy means some part of the image is lost. This may not be visible to the human eye. However, if too much compression is used it will be noticeable.
Lossless means no part of the image is lost. Not one pixel is changed.
Typically, lossy can give you a smaller file size with the trade-off of losing some image detail. If you don’t want any loss of detail, use only lossless optimization. Using both is usually best.
Lossy Image Optimization – Image Quality
For PNG images there are a few lossy image optimization tools. One good option is the TinyPNG website. They also have a WordPress Plugin which allows 500 images per month for free. I don’t use PNG very often, so I just use their website.
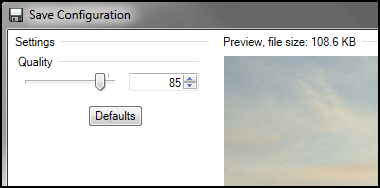
When you save your pictures as JPG there’s usually a window that pops up (depending on the tool you use) asking what Quality Percentage you want.
This depends on the picture, but typically between 80% to 90% Quality should keep the picture looking good (and doesn’t make the picture’s file size too big). In the image preview or after saving the picture make sure it still looks good to you.
TinyPNG also works on JPG files, but I find the quality isn’t very good. I don’t recommend using it for JPG files.
Lossless Image Optimization – Image Quality
You already did a big part of the image optimization when saving the JPG with your desired Quality setting percentage. The last step now is to do lossless image optimization. This will squeeze out a little more file size savings.
There are several tools available to do this on your PC or Mac like Riot or ImageOptim.
I prefer to let a plugin handle this step. One less manual step saves a little time!
But either way, all the different copies that WordPress automatically created of your pictures are now all optimized.
I recommend the free WordPress Plugin: WP Smush. It will automatically perform lossless optimization on your pictures when uploaded to WordPress. Any pictures already uploaded can be optimized 50 at a time. The only issue that can come up is that the file size is limited to less than 1 MB. But that really shouldn’t be a problem, since you resized your images to reasonable dimensions and file size, right?
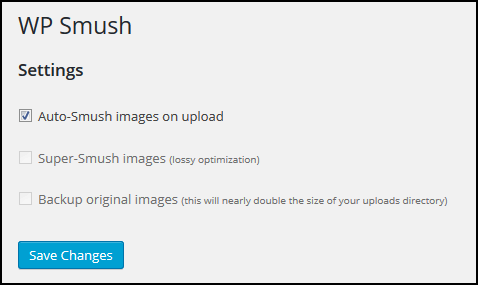
Typical file size savings are between 4% to 15%. It doesn’t sound like a lot, but every little bit helps when it comes to page size and your website load time.
Image Editing Tools
All of this might seem like a lot of steps, but it’s worth the effort. Next, I’ll give you two tools I like to use to save some time and to finish up my Image Optimization Guide.
Besides Photoshop, the photo editing tool I like to use is called paint.net and is available for free (Windows only). It has tons of options and I really can’t believe it’s free!
And if you like TinyPNG there’s a paint.net plugin for TinyPNG. This helps speed up the process a little.
Another hidden gem I discovered and have used for years is called Picture Resizer 6.0 (for Windows). If you have a lot of pictures to resize this is a great tool. It only works for JPG files though.
Rename the application file PhotoResize400.exe to include any of the options you want which are listed on their website. Now put a copy of all your original pictures to be resized in a folder (don’t use original files!), and drag that folder onto the Application’s .exe file in Windows Explorer.
I mentioned the tool Riot above. It can also do batch optimization, but I prefer Picture Resizer.
I won’t go into too much detail about the Picture Resizer tool, but as an added bonus I will give you the settings I use.
I rename the file to: PhotoResizeF1280x720IQ85.exe
This means:
F1280x720 – Image Dimensions will be a maximum of 1280 by 720 pixels
I – Overwrite source files (that’s why you copied your original pictures into a folder)
Q85 – Image Quality will be 85%
This tool resizes and also does lossy image optimization automatically. Be sure to check through your images to make sure they still look good. If needed, increase the Quality setting. The only thing left to do after using this tool is lossless image optimization.
Speed Up WordPress: Image Optimization Guide Wrapping Up
You want your website visitors to have a good user experience. And optimizing the images on your website will speed things up. Google also likes this for search engine rankings of your website. Let’s recap:
- Use less pictures
- Use the right file format for your images
- Create pictures that are the right dimensions for your website design and theme
- Make a compromise between file size and picture quality
- Use lossy and/or lossless image optimization
- Pick the right tools to speed up the process